- Leon County Schools
- Software Help Guides
- Learn At Home Tools
- Using Zoom in Classrooms
Technology (TIS)
Page Navigation
- Overview
- Help Desk
- Policies & Standards
- Project Management Office
- Security Awareness
- Vendor Digital Systems Status
- Instructional Technology
-
Software Help Guides
- Absence Management
- Blackboard
- ClassLink
- FileBound
- LanSchool
- Learn At Home Tools
- Leon Leads / PD
- Liquid Office
- Multi Factor Auth (2FA)
- Office Suites
- Peachjar eFlyers
- Remind
-
Schoolwires
- Schoolwires FAQ
- Teacher Web Training Pg
- Teacher Quick Links
- Sample SW Apps
- Sample Page Types
- Schoolwires Sandbox
- SharePoint 365 (Online)
- Skyward
- Unify
- VPN
- Windows 7
- Windows 8
- Staff Directory
- TIS Services Catalog
- Tech Equipment User Manuals
- Training Calendar
- Web Reports
- Cool Technologies
- Survey Variations
- Clear Your Cache
Best Practices for Securing Your Virtual Classroom when using Zoom
-
Content by Zoom - https://blog.zoom.us/wordpress/2020/03/27/best-practices-for-securing-your-virtual-classroom/

This blog was updated March 31 with information about the default setting for Zoom Waiting Rooms.
With a rise in the number of people using Zoom to stay connected, there have been increasing concerns about how secure the video chats are. In fact, the Federal Bureau of Investigation (FBI) has responded to several reports of video calls being disrupted by uninvited users, or "Zoombombed." as you are dealing with students, you must keep in mind the safety of your Zoom calls, here's how you can protect Zoom calls from Zoombombing, according to guidance from the FBI.
However we know teachers might end up using Zoom for a specific reason or another, so if you do use Zoom, you MUST use Zoom safely because unlike Teams, Zoom has many ways for a virtual meeting to go wrong. If you are not careful, you will become the latests victim of "Zoombombing" which the FBI has put out an alert on. - https://www.us-cert.gov/ncas/current-activity/2020/04/02/fbi-releases-guidance-defending-against-vtc-hijacking-and-zoom
Zooms response to their security issues - https://blog.zoom.us/wordpress/2020/04/01/a-message-to-our-users/
Zoom has helped thousands of schools and teachers around the world quickly shift to remote virtual learning, and we want all of them to have the same productive environment as their traditional classroom settings.
Zoom comes pre-stocked with numerous security features designed to control online classrooms, prevent disruption, and help educators effectively teach remotely. Here are some best practices for securing your virtual classroom using Zoom.

Zoom Operational Status
-
How to download Zoom Recordings from the Cloud
Technology and Information Services (TIS) would like to inform all Zoom users of an upcoming change that is necessary to maintain optimal performance. Since the start of school, more than 130,000 Zoom meetings have been held with over 26,500 meetings recorded. For teachers choosing to use the recording option, it provides a meaningful way for students who miss the class to catch up later. However, such a large number of recordings leads to strain on our systems and can clutter up the student experience in Canvas.
To that end, a recording retention policy will be put into place effective November 3, 2020. All recordings will auto-delete after 30 days. If you would like to permanently save a recording(s), please refer to the download instructions. See Download instructions guide here
If you would like to tidy up your recordings now, you may use the following steps:
- Login to Canvas
- Select your course
- Click Zoom
- Click Cloud Recordings
- Click the delete button by any old videos (alternatively: you may check any videos you don’t want and click delete selected, or delete all if you want to remove all past videos)
-
Change your screen name in Zoom
To set your Zoom name.
Join meeting using code not the link. Then you will get a box that gives you the ability to set your name for that meeting and all future meetings.
-
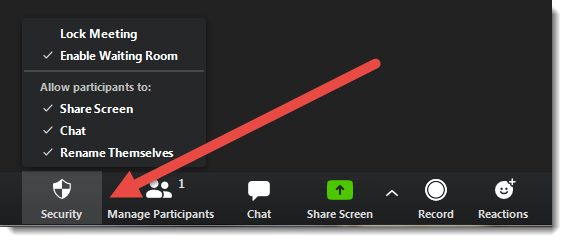
New!! - Manage security features in one easy to access area!

Important security features are now located in a handy area directly on the meeting bar to the left of the manage participantants.
Educator specific guides (MANY more below)
- Zoom Rolled out a guide for administrators on setting up a virtual classroom.
- Zoom Set up a guide on how to better secure their virtual classrooms.
- Zoom Set up a dedicated K-12 privacy policy.
-
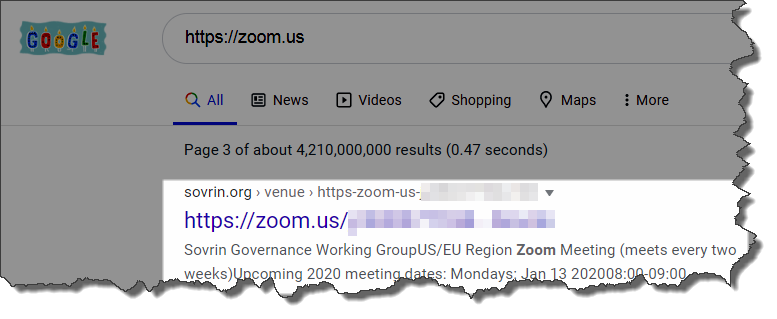
NEVER post your Zoom meeting links publicly (Zoombombing)
Google may be great, but it easily captures more than you want or intended sometimes. If you publicly post your Zoom meeting links on a website, social media, etc. Google can capture that information making it very simple for bad actors to simply look up random links and "Drop in uninvited" on your meeting. If you also make the mistake of not properly managing your meetings security settings using the methods explaind in the tips below, you will end up being "Zoombombed" and the results can be very bad as often those doing so are looking to share inappropriate content in your poorly managed virtual classroom.

-
Lock your virtual classroom
Did you know you can lock a Zoom session that’s already started, so that no one else can join? It’s kind of like closing the classroom door after the bell. Give students a few minutes to file in and then click Participants at the bottom of your Zoom window. In the Participants pop-up, click the button that says Lock Meeting. (See security features above)
Manage your participants
Some of the other great features to help secure your Zoom event and host with confidence:
- Allow only signed-in users to join: If someone tries to join your event and isn’t logged into Zoom with the email they were invited through, they will receive this message:
This is useful if you want to control your guest list and invite only those you want at your event — other students at your school or colleagues, for example.
-
Control screen sharing
To give instructors more control over what students are seeing and prevent them from sharing random content, Zoom recently updated the default screen-sharing settings for our education users. Sharing privileges are now set to “Host Only,” so teachers by default are the only ones who can share content in class.
However, if students need to share their work with the group, you can allow screen sharing in the host controls. Click the arrow next to Share Screen and then Advanced Sharing Options. Under “Who can share?” choose “Only Host” and close the window. You can also change the default sharing option to All Participants in your Zoom settings.
-
Enable the Waiting Room
The Waiting Room feature is one of the best ways to protect your Zoom virtual classroom and keep out those who aren’t supposed to be there. Just like it sounds, the Waiting Room is a virtual staging area that stops your guests from joining until you’re ready for them.
Meeting hosts can customize Waiting Room settings for additional control, and you can even personalize the message people see when they hit the Waiting Room so they know they’re in the right spot. This message is really a great spot to post any rules/guidelines for your event, like who it’s intended for.
When enabled, you have two options for who hits the Waiting Room before entering a class:
- All Participants will send everyone to the virtual waiting area, where you can admit them individually or all at once.
- Guest Participants Only allows known students to skip the Waiting Room and join but sends anyone not signed in/part of your school into the virtual waiting area.
The virtual Waiting Room can be enabled for every class (in your settings) or for individual classes at the scheduling level.
Update: Starting March 31, the Waiting Room feature will be automatically turned on by default. Visit our support page for more information on adjusting your Waiting Room settings.
-
Lock down the chat
Teachers can restrict the in-class chat so students cannot privately message other students. We’d recommend controlling chat access in your in-meeting toolbar controls (rather than disabling it altogether) so students can still interact with the teacher as needed.
Remove a participant
If someone who’s not meant to be there somehow manages to join your virtual classroom, you can easily remove them from the Participants menu. Hover over their name, and the Remove option (among other options) will appear. Click to remove them from your virtual classroom, and they won’t be allowed back in.
-
Security options when scheduling a class
The cool thing about Zoom is that you have these and other protection options at your fingertips when scheduling a class and before you ever have to change anything in front of your students. Here are a few of the most applicable:
- Require registration: This shows you every email address of everyone who signed up to join your class and can help you evaluate who’s attending.
- Use a random meeting ID: It’s best practice to generate a random meeting ID for your class, so it can’t be shared multiple times. This is the better alternative to using your Personal Meeting ID, which is not advised because it’s basically an ongoing meeting that’s always running.
- Password-protect the classroom: Create a password and share with your students via school email so only those intended to join can access a virtual classroom.
- Allow only authenticated users to join: Checking this box means only members of your school who are signed into their Zoom account can access this particular class. (Though we are using the K-12 Education Zoom accounts. LCS DOES NOT ISSUE STUDENT ACCOUNTS, only teachers have authenticated accounts, so do NOT use this feature!!)
- Disable join before host: Students cannot join class before the teacher joins and will see a pop-up that says, “The meeting is waiting for the host to join.“
- Manage annotation: Teachers should disable participant annotation in the screen sharing controls to prevent students from annotating on a shared screen and disrupting class.
Additionally, teachers have a couple in-meeting options to control your virtual classroom:
- Disable video: Turn off a student’s video to block distracting content or inappropriate gestures while class is in session.
- Mute students: Mute/unmute individual students or all of them at once. Mute Upon Entry (in your settings) is also available to keep the clamor at bay when everyone files in.
- Attendee on-hold: An alternative to removing a user, you can momentarily disable their audio/video connections. Click on the attendee’s video thumbnail and select Start Attendee On-Hold to activate.
- Lock the meeting: It’s always smart to lock your front door, even when you’re inside the house. When you lock a Zoom Meeting that’s already started, no new participants can join, even if they have the meeting ID and password (if you have required one). In the meeting, click Participants at the bottom of your Zoom window. In the Participants pop-up, click the button that says Lock Meeting.
- Set up your own two-factor authentication: You don’t have to share the actual meeting link! Generate a random Meeting ID when scheduling your event and require a password to join. Then you can share that Meeting ID on Twitter but only send the password to join via DM.
- Remove unwanted or disruptive participants: From that Participants menu, you can mouse over a participant’s name, and several options will appear, including Remove. Click that to kick someone out of the meeting.
- Allow removed participants to rejoin: When you do remove someone, they can’t rejoin the meeting. But you can toggle your settings to allow removed participants to rejoin, in case you boot the wrong person.
- Put ‘em on hold: You can put everyone else on hold, and the attendees’ video and audio connections will be disabled momentarily. Click on someone’s video thumbnail and select Start Attendee On Hold to activate this feature. Click Take Off Hold in the Participants list when you’re ready to have them back.
- Turn off file transfer: In-meeting file transfer allows people to share files through the in-meeting chat. Toggle this off to keep the chat from getting bombarded with unsolicited pics, GIFs, memes, and other content
- Disable private chat: Zoom has in-meeting chat for everyone or participants can message each other privately. Restrict participants’ ability to chat amongst one another while your event is going on and cut back on distractions. This is really to prevent anyone from getting unwanted messages during the meeting.

-
Important recommendation for teachers
Teachers: We encourage you to NOT post pictures of your virtual class on social media or elsewhere online. While it’s fun to share in the excitement of connecting over Zoom, we are particularly committed to protecting the privacy of K-12 users and discourage publicly posting images of students, especially minors, in a Zoom virtual classroom.
-
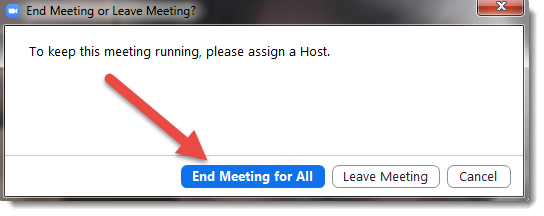
Ending the Meeting for All when finished
Teachers: We encourage you to END the meeting for all when done with a Zoom meeting. This will prevent students from loiutering around after you have finished the interaction and prevent students from clicking a meeting created as a scheduled appointment and allowing students to start up their own meeting.

-
Get Zooming securely
You can also check out this video on securing your virtual classroom from the Zoom team:
Additionally, we’ve compiled several great resources to help teachers and administrators — even the most technology-challenged ones — get quickly trained on Zoom and pick up some best practices for educating over Zoom.
We invite you to learn about the additional benefits Zoom’s Education plan can provide for virtual learning and remote education.


